
The best Palworld difficulty settings are not the presets the menu hands you. Palworld 1.0 ships with four built-in difficulties, but the flexibility sits under the Custom option, where roughly 40 sliders let you reshape capture rates, combat stakes, egg timers, and death penalties into a game that fits how you want to play. The good news up front: changing any of them does not switch off achievements or trophies, so you can tune freely without losing progress.
Key Takeaways
- Custom is the best “difficulty”: the four presets are just starting points, and the Custom menu lets you change one setting or forty without penalty.
- Achievements stay on: custom and adjusted settings do not disable Steam achievements or PlayStation and Xbox trophies. Players have earned the platinum with everything boosted in their favor.
- The one setting everyone should change: huge egg incubation time. Hard and Hardcore multiply it by 36, which pushes some hatches past real-world days.
- Best all-round setup: start from Normal, drop egg incubation to zero, set the death penalty to items only, turn off equipment durability loss, and push Pal Appearance Rate to about 3 for a livelier world (watch performance).
- Solo players should avoid Hard: its defaults, especially the egg timers, are built with groups in mind and punish single players for no real payoff.
- Do Difficulty Settings Disable Achievements in Palworld?
- Palworld’s Built-In Difficulty Presets Explained
- What Each Custom World Setting Changes
- Best Difficulty Presets for Every Playstyle
- The Best Way to Play Palworld 1.0
- Other Ways to Play Palworld
- Gear for Long Palworld Sessions
- Frequently Asked Questions
- Summary
Do Difficulty Settings Disable Achievements in Palworld?
No. This is the first thing most players want to know, and the answer is clear across both storefronts: adjusting the difficulty or using fully custom world settings does not disable achievements on Steam or trophies on PlayStation and Xbox. Multiple players have confirmed unlocking achievements on custom singleplayer files, and the PlayStation community rates the platinum an easy 2 out of 10 precisely because you can boost every setting in your favor and still earn every trophy.
There are no difficulty-locked achievements in Palworld, so nothing is gated behind Hard or Hardcore. The only unrelated snag players have reported is that achievements may not sync if your connection drops mid-session, in which case they re-register once you reconnect. Play on whatever settings you like and the achievement list keeps ticking.
If you are returning for 1.0 and want the full rundown of what changed at launch, our Palworld 1.0 overview covers the new content and the price change before you pick a difficulty.
Palworld’s Built-In Difficulty Presets Explained
Palworld offers four preset difficulties before you ever touch a slider. Each one bundles a set of multipliers, and understanding what they change tells you which is closest to the experience you want. Here is what each preset does compared to the standard game.
| Preset | EXP | Capture | Death Penalty | Best For |
|---|---|---|---|---|
| Casual | +30% | 2x | No items dropped | Relaxed building and collecting |
| Normal | 1x | 1x | Drop all items and equipment | The intended, balanced experience |
| Hard | -20% | -20% | Lose items, equipment, and Pals | Survival veterans who want resource pressure |
| Hardcore | -20% | -20% | Pal permadeath, no player respawn | One-life, high-stakes runs |
Casual softens almost everything: players take 50% less damage, deal 30% less, gather double resources, and never drop items on death, with huge eggs hatching instantly. Normal is the reference build the game is balanced around. Hard layers on real punishment, with players taking four times the damage, 50% fewer gathered resources, and a 36x huge-egg incubation multiplier that can push a single hatch toward 72 hours.
Hardcore, added in the Feybreak update and carried into 1.0, is the unforgiving option. It keeps the reduced EXP and capture rates and the long egg timers, applies double incoming damage, and adds the two rules that define it: your Pals die permanently if they fall, and you cannot respawn after death. It is a genuine one-life challenge rather than a numbers tweak, and it is the only preset most players will want to leave strictly alone unless they are chasing that specific tension.
What Each Custom World Setting Changes
Selecting Custom unlocks the full World Settings menu, where every rule becomes a slider or toggle. The values work as multipliers: 0 disables an effect, 0.5 halves it, 1 is normal, and 2 doubles it. These are the settings that matter most for shaping a run.
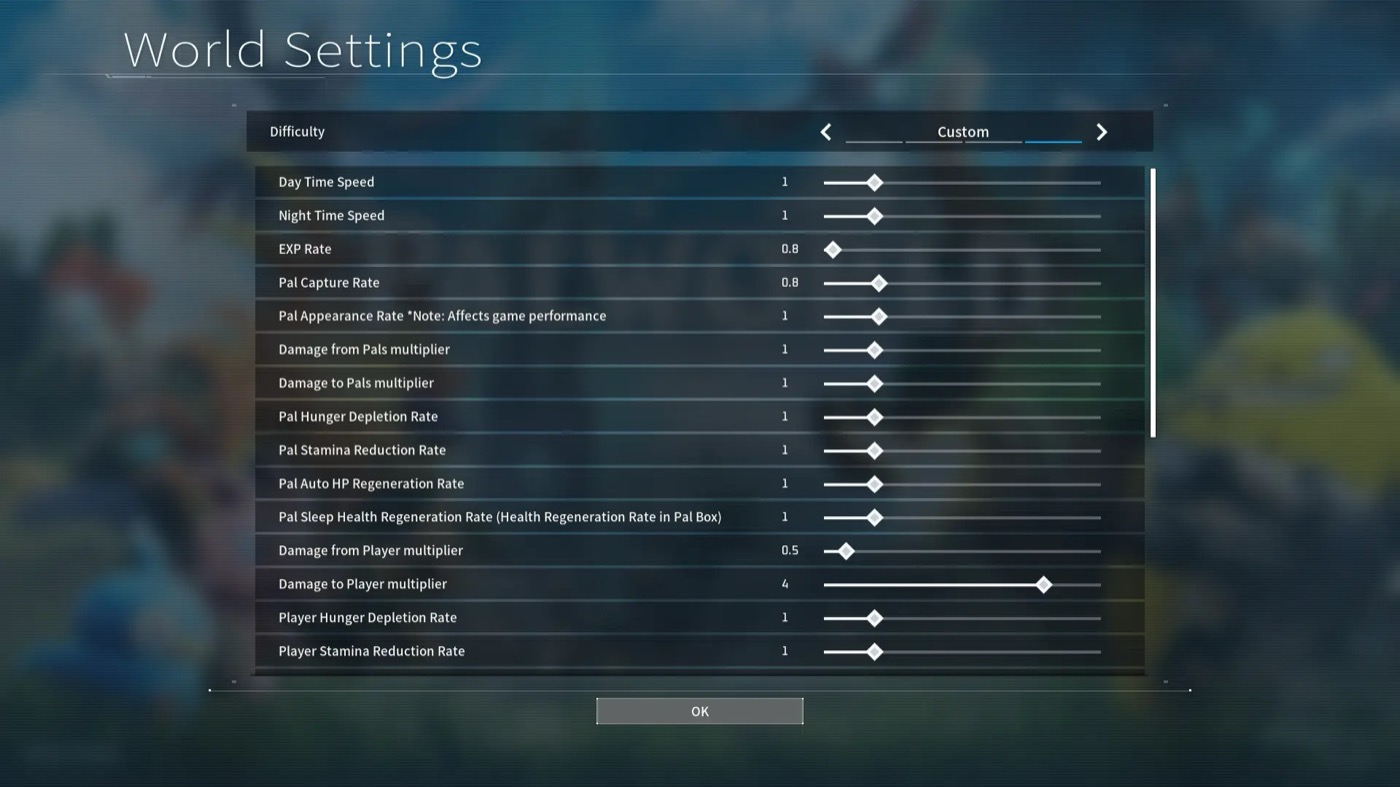
| Setting | What It Changes |
|---|---|
| EXP Rate | How fast you and your Pals level up |
| Pal Capture Rate | Your chance of successfully catching a Pal |
| Pal Appearance Rate | How densely Pals spawn in the world; higher means more Pals to catch and farm but a heavier performance load |
| Damage to Player | How much incoming damage you take (the core combat difficulty dial) |
| Damage from Player | How much damage you deal |
| Time to Incubate Huge Egg | Hatch time for huge eggs, from 0 hours up to multi-day waits |
| Death Penalty | No items lost, items only, items and equipment, or items, equipment, and Pals |
| Equipment Durability Loss | How fast weapons, armor, and tools wear out and need repair |
| Perishable Item Decay | How quickly food and materials spoil |
| Structure Deterioration | How fast bases outside the Palbox zone decay |
| Day and Night Time Speed | How long daylight and darkness last |
| Max Pals Per Base | How many working Pals each base supports |
| Enable Raid Events | Whether raids attack your base |
That is not the full list. The menu also covers Pal hunger and stamina, gatherable respawn rates, structure health, item weight, guild and server limits, and toggles for friendly fire, predator Pals, and permadeath. You can build a run from scratch, or pick a preset and change only the one thing that bothers you.
Best Difficulty Presets for Every Playstyle
These are community-tested starting points pulled from what players recommend on Reddit and the Steam forums. Treat each as a base and nudge individual sliders from there.
Relaxed Builder (Casual Creative)
For players who are here to build and collect, not to sweat. Set EXP Rate to 2, Pal Capture Rate to 2, huge egg incubation to 0, incoming damage to 0.5, item weight to 0.5, and equipment durability loss and structure deterioration to 0. Turn raids off and set the death penalty to no items dropped. Push Pal Appearance Rate to around 3 for a denser world packed with more Pals to collect, dialing it back only if your framerate suffers. You get creative freedom with almost no friction.
Balanced (Normal With Quality of Life)
Keep most multipliers at 1 to preserve Normal’s intended pacing, but drop huge egg incubation to 0 or 1 and set the death penalty to items only. Leave raids on. This is the everyday sweet spot: real stakes in combat, none of the artificial waiting.
Hardcore Survival
For players who want Palworld to bite back. Set EXP Rate to 0.75, Pal Capture Rate to 0.75, incoming damage to 1.5, and item weight to 1.5, with raids on and the death penalty set to items and equipment. If you want the full one-life experience, use the Hardcore preset instead and accept Pal permadeath and no respawns.
Solo Player
Normal is the intended solo experience, and Hard is widely discouraged for single players because its egg timers assume a full group cycling hatches. Start from Normal, drop huge egg incubation to 1, and consider setting your damage output to around 2 while cutting incoming damage to 0.5 so one player can handle fights meant for a team.
Co-op Group
With more players sharing the load, you can afford more pressure. Base it on Balanced, but nudge incoming damage up toward 1.5 so bosses stay threatening, raise the max Pals per base so everyone can build, and keep friendly fire off unless your group wants the chaos.

The Best Way to Play Palworld 1.0
If you want one recommendation, build a Custom world from Normal and change only these settings:
- Huge egg incubation, set to 0: removes the multi-day hatch waits, the game’s single biggest time sink.
- Death penalty, items only: you keep your equipment and Pals when you die without removing all consequence.
- Equipment durability loss, set to 0: no more stopping to repair weapons, armor, and tools.
- Pal Appearance Rate, around 3: a denser world with far more Pals to catch and farm, as long as your framerate holds up.
- EXP, capture, and damage, left at 1: Normal’s values keep combat, catching, and progression balanced the way the developers intended.
- Raids, left on: keeps base defense a real part of the game.
The logic is simple. Normal is the difficulty the game is balanced around, and these changes only strip out the two most disliked time sinks, the egg timers and the repair loop, while leaving every real stake in place.
From there, tune one dial if you need to. Solo players can nudge EXP to around 1.25 to offset having no teammates, and anyone who finds early combat punishing can drop incoming damage to 0.5 on its own. Once your world is dialed in, our Palworld tier list helps you build a roster that matches the pace you have set.
Other Ways to Play Palworld
The settings menu supports a few less obvious styles worth trying once you have a run or two behind you.
- Randomizer or Nuzlocke run: Custom worlds include optional challenge rules like a Pal randomizer and Nuzlocke-style restrictions for players who want a fresh, unpredictable playthrough.
- True Hardcore permadeath: the Hardcore preset removes respawns and makes Pal deaths permanent, turning every fight into a real risk. It is the closest Palworld gets to a roguelike run.
- Peaceful creative mode: max out EXP and capture, zero out death penalties, structure decay, and durability, and disable raids to focus entirely on base design and Pal collecting.
- Trophy and achievement rush: because settings do not disable rewards, you can boost capture, EXP, and damage to their maximums to blitz the achievement list, which is how that 2 out of 10 platinum rating happens.
- Fresh solo survival: new players who want the classic learning curve can stick with untouched Normal and lean on our Palworld beginner guide for the early hours.
Gear for Long Palworld Sessions
Base building and Pal farming are long, cozy sessions, so the gear that keeps you comfortable through them earns its place. A pro controller you can remap, a clear headset for co-op calls, and a stand that keeps a spare controller charged all suit marathon runs on Xbox and PC. Here is a budget-friendly setup most /SKILL readers land on.

PowerA FUSION Pro Wireless
A pro Xbox controller with mappable back paddles for tailoring controls to your run, currently around half off (renewed).

Logitech G PRO X Wireless
Clear surround sound and a strong mic for co-op raids and base calls, discounted well below list price (renewed).

Razer Quick Charging Stand
Magnetic charging that keeps a spare Xbox controller topped up through hours of base farming.
Between Palworld sessions, Berry Finds tracks real-time Amazon deals on thousands of everyday products across home, kitchen, beauty, and more so you never overpay on the stuff you buy regularly.
Frequently Asked Questions
Do custom difficulty settings disable achievements in Palworld?
No. Custom and adjusted world settings do not disable Steam achievements or PlayStation and Xbox trophies. Players have earned the full achievement list, including the platinum, with every setting boosted in their favor. There are no difficulty-locked achievements in the game.
What is the best difficulty for solo play in Palworld?
Normal is the intended solo experience. Hard is discouraged for single players because its 36x egg incubation timers assume a full group. For a smoother solo run, start from Normal and drop huge egg incubation to 1, and optionally raise your damage output and lower incoming damage.
Can you change difficulty settings after starting a Palworld world?
Yes. You can adjust most world settings after creating a world, so you are not locked into your first choice. This makes it easy to start on Normal and tune individual sliders like egg timers or the death penalty as you learn what you prefer.
What is the single most important setting to change in Palworld?
Huge egg incubation time. The Hard and Hardcore presets multiply it by 36, which can push a single hatch past real-world days. Setting it to 0 or 1 removes the game’s most common source of frustration without affecting combat or progression balance.
What does the Hardcore difficulty do in Palworld?
Hardcore keeps reduced EXP and capture rates, long egg timers, and double incoming damage, then adds the two rules that define it: your Pals die permanently if they fall, and you cannot respawn after dying. That makes it a genuine one-life challenge rather than a simple stat adjustment.
Summary
The best Palworld difficulty settings come down to one move: pick Custom and build the run you want. The four presets are useful reference points, but Casual is often too soft, Hard punishes solo players with brutal egg timers, and Hardcore is a one-life challenge for a specific mood. None of it touches your achievements or trophies, so there is no reason to suffer settings you dislike. And if you are leaning on a higher EXP rate, our guide to the fastest ways to get experience covers the best XP farms.
For most people, a Custom world based on Normal, with instant egg hatching, an items-only death penalty, and no durability loss, is the sweet spot: real stakes, none of the grind. From there, change the single dial that bothers you and keep playing. When you are ready to optimize your team, the Palworld tier list ranks the best Pals for combat, base work, and mounts in 1.0.